Showing posts with label Motor Planning Activities. Show all posts

Saturday, August 30, 2025

Obstacle Course Ideas!

An obstacle course is a great activity to work on improving a child’s body awareness, motor planning, strengthening, sensory processing, and ability to follow instructions. When creating an obstacle course for a child, it can be very motivating to follow a theme that is of interest to the child. For example, possible themes are dinosaurs, jungle animals, or outer space. 

An example course might require the child to hop on one foot to a pile of pillows where the child finds a hidden item. Use an animal walk (i.e. bear walk) to go to another destination to complete a fine motor activity. Lastly, walk on a balance beam to the finish line.  Here are some additional skills that can be addressed with obstacle courses.

·      Following multi-step directions

·      Midline crossing activities

·      Work on core strength

·      Running

·      Climbing

·      Fine motor tasks

·      Balance

Thursday, December 9, 2021

More Motor Planning Activities for Kids!

In my last post, I shared about motor planning, which is the ability to plan, organize, sequence, and carry out actions. Below you will find some more kid-friendly motor planning activities!


Kick Ball: You and your child get in a crab walking position facing each other with a balloon in the middle. Kick the balloon up in the air with one foot and take turns trying to keep the ball in the air by kicking it.


Bean Bag Toss: Tape different shapes on the floor and give the child several beanbags. Tell the child to toss a bag on the square first, then on the circle, then on the triangle. If you have various colors, say “toss the blue bag inside the green square, etc.”  Increase the complexity of the directions as needed.


Cereal Stacking: Stick a toothpick into a piece of foam or a small ball of clay/putty and have child place fruit loops or cheerios on the toothpick using the tongs. If they squeeze to hard, they’ll crush the cereal, so this is great for increasing control and dexterity.


Sticky Note Targets: Write letters or draw shapes on yellow sticky notes and stick them to the wall. Give the child a small ball (ping pong or Nerf ball and have them throw it at the target “letter or shape” that you call out.


Net Toss: Get a net (butterfly) from the dollar store and have the child catch a nerf ball with the net when you throw it to different sides of his body.


Tuesday, November 23, 2021

5 Fun Motor Planning Activities for Kids!

Motor planning is the ability to plan, organize, sequence, and carry out actions, and it is involved in most every task we complete! Motor planning is sometimes called praxis, and when someone has difficulty with motor planning, it is called dyspraxia. Below you will find 5 fun kid-friendly motor planning activities!

 
Photo Credit: Virginia State Parks Staff
 
Wheelbarrow Walking: Wheelbarrow walk the child to a spot and have two bowls (i.e. one yellow, one blue) there.  Instruct the child place the yellow items in the yellow bowl and blue items in the blue bowl.  Wheelbarrow walk to a 2nd designated area where you’ve taped a small circle, square, and triangle on the floor. Give instructions: “Touch the square then the circle.” Increase the complexity: “Trace the circle with your finger then touch the triangle.” Take a break. Child may need to rest between activities.

Sidewalk Chalk Fun: Write numbers and letters on the sidewalk. Give the child a playground sized ball and tell him to “bounce the ball on the 5 then on the B.” Increase the complexity of the directions as needed.

Sidewalk chalk or tape out something similar to a hopscotch pattern.  Fill each square with a color/shape/letter, then give the child various instructions. “Hop with one foot on to the square with the letter C, then hop on both feet to the square with the number 4.” Increase the complexity of the directions as needed.

Balloon Game: Suspend a balloon from the ceiling or a door frame using a long piece of string. Have the child hit the ball while saying or singing the A-B-C’s or while counting. For example, A- hit the balloon, B- hit the balloon, etc. You can also make this more difficult by removing the string, and having him keep the balloon in the air as long as possible by hitting it while saying the A-B-C’s. Can she get all the way through the alphabet and keep the balloon in the air? This is also a fun activity for practicing spelling words!

Suspended balloon: Call out instructions and have the child follow them: “hit the balloon with your elbow! Hit it with your nose, etc.”

Bubble Fun: Have the child hop on one foot in place while you blow bubbles in her direction. Have them “clap” the bubbles to pop them while hopping.

Sunday, February 21, 2021

Magnificent Motor Planning Game!

You've got to try this "Magnificent Motor Planning Game" to address motor planning and gross motor skills, including balance, and coordination! It's also great to promote attention and help with following directions.

Items Needed
Typing Paper
Printer
Laminate 
Instructions: Make the "key" as seen above by typing a motor skill activity next to a certain color of circle. Examples of activities are "jump in place 5 times," "spin in a circle," "complete two jumping jacks," and "hop on one foot 3 times." Create strips of paper that have different combinations of colored circles on each one. Some can have two different colored circles, others can have three, etc. Laminate the "key" and "circle strips." Have the child close her eyes and pick one of the strips, then she can practice carrying out the activities in the correct order by following the "key!"

This project was completed by a Master of Occupational Therapy student at The University of Tennessee Health Science Center and posted with permission.

Sunday, November 1, 2020

Fun Motor Planning Activity!


If you are looking for a fun activity that addresses poor motor planning skills, here is just what you are looking for!

 Materials
-Carpet mark-it spots - Available on Amazon or vinyl spot markers - in different colors (These can also be made out of construction paper and secured to the floor with tape.)           

- Strips of paper with circles printed on the in varying order- laminate these                                       

-"Key" with instructions for different motor tasks next to each colored circle- also laminated

How to Play:
Position the carpet mark-it spots in a circle and instruct the child to stand in the middle. The child should draw a card and perform the tasks in the order of the colored dots.  For example, if the card had a purple circle then a red circle, the child would look at the cheat sheet, go to that particular colored circle on the floor, and then perform the each task.


For a neat twist, pay close attention to the child and mirror what he or she does. Then switch it up and have the child copy you!

This project was completed by a Master of Occupational Therapy student at The University of Tennessee Health Science Center and posted with permission.

Friday, July 10, 2020

Therapy on a Shoestring Budget: DIY Lacing Shape Cards

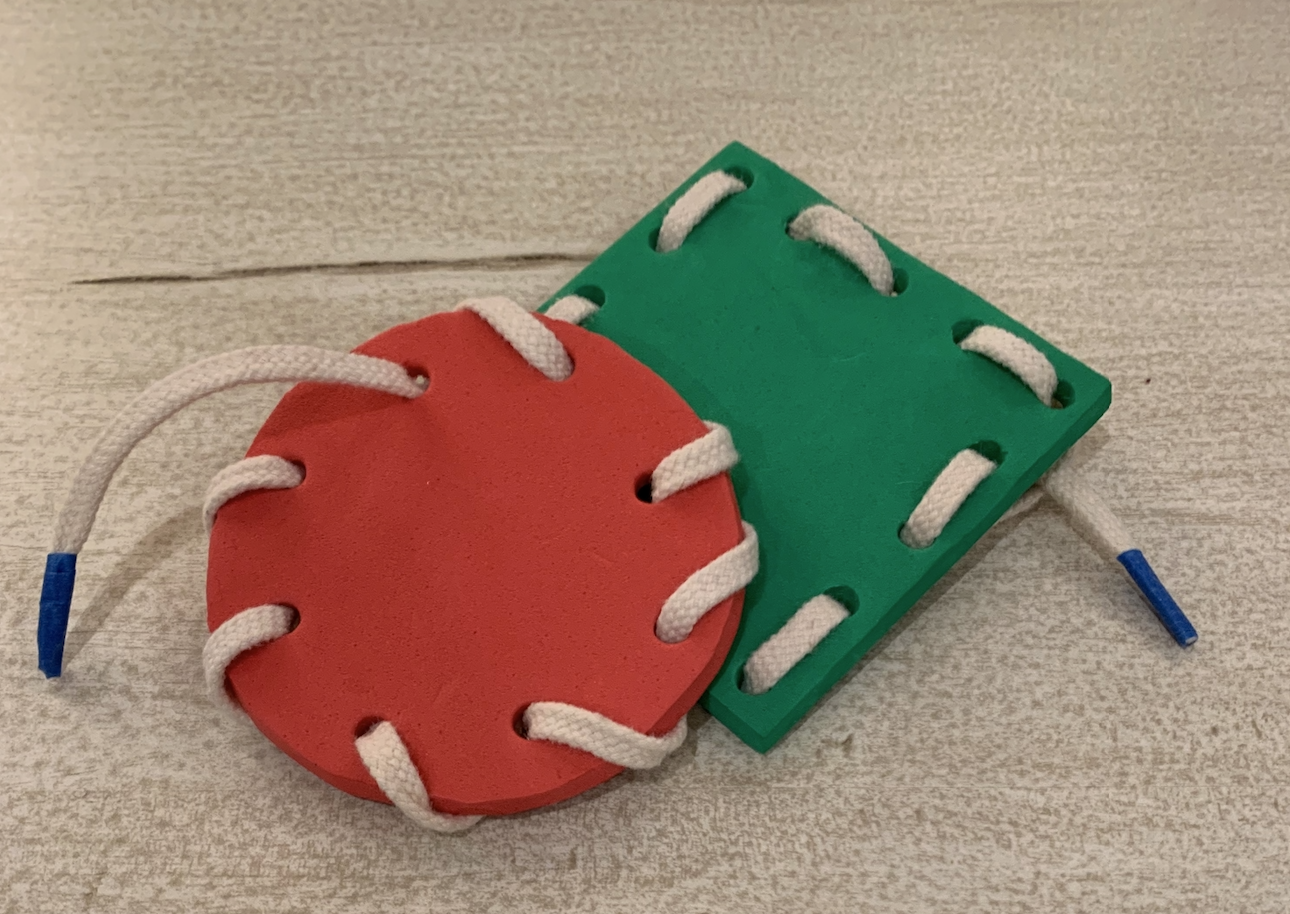
These DIY lacing cards are a fun way for a child to work on fine motors skills, bilateral integration (using two hands together), and motor planning! Making them in a variety of shapes and colors will help a child learn to distinguish their differences. You can also use a sharpie to write letters or numbers next to each lacing hole to work on letter and number recognition. Use your imagination to come up with other fun variations!

ITEMS NEEDED:
Scissors, single-hole punch, Colorations Foam Door Hangers, shoe laces, string, or ribbon

INSTRUCTIONS:
Use this shape sheet as a pattern. (The sizes may need to be adjusted.) Trace each shape onto a different piece of foam, and use the scissors to cut them out, and use the hole punch to punch out the lacing holes. (Save the scraps of foam to use with another DIY project that I will be posting about soon.)

If you are using string or ribbon, wrap a piece of tape around each end. Now it's time to start lacing! 

Tuesday, August 19, 2014

Hula-Hoop T-Shirt Rug Activity

The University of Tennessee Health Science Center Masters of Occupational Therapy students completed some awesome media projects that I'm going to be sharing with you in a number of upcoming posts.

For the assignment, each student was given the name of a common household item, such as a paper plate.  They were instructed to design a creative, appropriate therapy activity for a patient with a specific diagnosis. They did an amazing job! This first media project was submitted by Ashleigh. Her item was a hula hoop. This activity works on ROM, stretching, visual motor skills, and motor planning skills.


Hula-Hoop T-Shirt Rug Activity

Materials Needed:
Hula-Hoop
6-9 t-shirts (without side seam)
1 Youth Large (used for spokes)
Scissors


Directions:
1)    Starting at the bottom of the shirts, cut the t-shirts in to 1-inch strips. Do not use the bottom strip that includes the seam. You will need 11 loops for the first shirt (youth large). Cut the shirt all the way up the trunk until you reach the sleeves. (The rest of the shirt will not be used)
2)    Using the 11 loops from the youth shirt, stretch the first one around the hula-hoop.
3)    Stretch the next loop onto the hula-hoop perpendicular to the first loop.
4)    Continue step 3 until all 11 loops are used.
5)    Push two spokes together to help create a weaving pattern.
6)    Wrap a strip of t-shirt around the 2 spokes (that you just pushed together) and pull it back through itself.
7)    Weave the strip over and under, keeping the two layers of the strips together until you reach about 5 layers. At the end of the loop, wrap another loop around and pull it back through on itself.
8)    Push the pieces down on the rug so that no spaces are seen, but do not pull it too tight because the rug will not lie flat.
9)    After the fifth layer, weave between each spoke individually. When you get to the spoke that was pushed together, separate it and keep one together and separate the other. Continue the over-under pattern until you reach the desired size of the rug.
10)  Cut the last loop and tie it to the closest spoke and tuck it into the rug
11)  Cut each loop (spoke) off the hula-hoop and double knot it.

The project above was completed by one of our Master's of Occupational Therapy students at
 The University of Tennessee Health Science Center and posted with permission.

Sunday, July 13, 2014

Motor Planning Balloon Games: Have Some Fun!!!


Suspend a balloon from the ceiling or a doorframe using a long piece of string. Have your child hit the ball while having her say or sing the A-B-C’s or while counting. For example, A- hit the balloon, B- hit the balloon, etc. You can also make this more difficult by removing the string, and having her keep the balloon in the air as long a possible by hitting it while saying the A-B-C’s. Can she get all the way through the alphabet and keep the balloon in the air? This is also a fun activity for practicing spelling words!

Dear Readers, If you have found my blog to be helpful, please "like" my Facebook page and follow my blog...Thanks :) 


Saturday, July 27, 2013

Fun Motor Planning and Auditory Processing Activities


Here are some fun games that can be enjoyed indoors or outside. If you prefer outdoors, use sidewalk chalk instead of tape.
Bean Bag Toss- Tape different shapes on the floor and give the child several beanbags. Tell him to toss a bag on the square first, then on the circle, then on the triangle. If you have various colors, say “toss the blue bag inside the blue circle, or toss the blue beanbag inside the red shape." You can then ask him, "which shape is red?" so that he has an opportunity to name it. If you want to keep score, give higher points for the smaller shapes.

A slightly more challenging activity is to have the child bounce a ball inside each of the shapes then catch it. Once again, call out the instructions: "Bounce the ball on the triangle, then the square, then the rectangle. You can call out one instruction at a time, or make it more challenging by giving multiple step instructions. You want the child to be challenged, but not frustrated. Have fun!


Dear Readers, If you have found my blog to be helpful, please "like" my Facebook page and follow my blog...I'm trying to get my book published and this would be a great help! Thanks :)